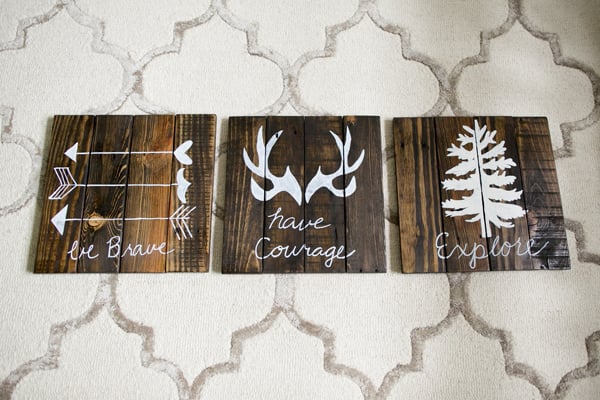
Learn how to make this rustic woodland boy nursery decor without using a cutting machine!
I love having a gender neutral nursery. These signs can be for a girl or a boy.
DIY Woodland Nursery Decor Project
I'm so excited to post this DIY! The inspiration came from searching Pinterest for woodland nursery decor with reclaimed wood that we saw online. For reference, here is my Boy Nursery Pinterest Board for all of my inspiration!
I purchased 12 pieces of "reclaimed wood" that was about 4 feet long off of Craigslist. At $2 a piece, I thought it was pretty pricey for what I really think was "old wood that sat out for a while".
We didn't use all of the 12 pieces that I picked from this pile for this project, but we were able to put them to good use on some other "woodland" projects for Ryan's hunting corner for the house (more on that in the future).
Tools and Supplies for DIY Nursery Woodland Rustic Wall Decor
- sander
- DeWalt Drill
- Roofing Nails
- Miniwax Wood Stain in Dark Walnut (have latex gloves and a few wash cloths near by for this part)
- Miniwax Fast Drying Polyurethane Clear Satin Finish (you could also use the semi gloss one for a shinier look)
- Hanging Wire
- D-Strap Hanger
- Not Pictured: ¼" thick Plywood (scrap from around the house)
- Not Pictured: Gorilla glue
- Reclaimed Wood (Craigslist it!)
- Ruler
- Pencil
- Paint Pen


Directions:
1. Figure out the measurement of the set that you want and cut the wood down to size.

2. Sand it really well so its nice and smooth. This DeWalt Sander was new for this project - it was super easy to change the sand paper and worked really well. We had an old sander that we borrowed from my dad for some other projects, I can now give that back to him 🙂

3. Cut a piece of plywood a little narrower than the boards put together. You will be using the Gorilla glue to glue this on the back of the reclaimed wood like so. Make sure you wipe off all of the loose debris!

4. For extra security, use the roofing nails to nail the plywood to the reclaimed wood.


I think he may have went a little overboard on having 12 nails. Pretty sure that we could have gotten away with just 8.

5. Then, using Miniwax Wood Stain in Dark Walnut stain the wood! Make sure you have latex gloves and cloth near by for this part.


6. Here's a comparison of the stain vs. non stained. We only put one coat on it! (Long story about that canoe covered in straw...)

7. After it dries, use the polyurethane to make it a little shinier. The semi-gloss works just as well!
8. Give it about 24 hours before you start on the art work to be on the safe side (even though it says 8 hours). After the waiting period, you can create your own design! I seriously just eyeballed the art that I wanted and traced wrote on the board with a pencil. I then went over it with a white paint pen.

Making Your Own Woodland Design Freehand
Here's a time lapse of me doing one of the boards:
9. Mount your hanging wire and d-straps onto the boards after it dries. Ensure the wire measurements are even with each other, otherwise you'll risk them being out of alignment when they are hung up next to each other on the walls.

How to Hang the Woodland Collage
In this image, I took my own tip from my "How to Hang Wall Art and Picture Collage" and used wrapping paper to see approximately where I wanted the art. Ryan then went back and measured specifically so that he knew exactly how far a part to put them with real exact measurements.

Voila - this is how it turned out! Can't wait to share you guys the ENTIRE room reveal for the nursery! Hope you found this tutorial on our DIY Rustic Woodland Boy Nursery Decor helpful!

Check out my other tutorial on how to create a hanging growth chart and height ruler for wall!
Woodland Nursery Wall Art Decor

Learn how to make this rustic woodland boy nursery decor without using a cutting machine!
Materials
- Roofing Nails
- Miniwax Wood Stain in Dark Walnut (have latex gloves and a few wash cloths near by for this part)
- Miniwax Fast Drying Polyurethane Clear Satin Finish (you could also use the semi gloss one for a shinier look)
- Hanging Wire
- D-Strap Hanger
- Reclaimed Wood (Craigslist it!)
- Ruler
- Pencil
- Paint Pen
Tools
- sander
- DeWalt Drill
Instructions
- Figure out the measurement of the set that you want and cut the wood down to size.
- Sand the wood down so that it is smooth.
- This DeWalt Sander was new for this project - it was super easy to change the sand paper and worked really well.
- You will be using the Gorilla glue to glue this on the back of the reclaimed wood like so. Make sure you wipe off all of the loose debris!
- For extra security, use the roofing nails to nail the plywood to the reclaimed wood.
- Using Miniwax Wood Stain in Dark Walnut stain the wood! Make sure you have latex gloves and cloth near by.
- After it dries, use the polyurethane to make it a little shinier. The semi-gloss works just as well!
- Give it about 24 hours before you start on the art work to be on the safe side (even though it says 8 hours).
- After the waiting period, you can create your own design by drawing freehand with the white paint pen.
- Mount your hanging wire and d-straps onto the boards after it dries.
- Ensure the wire measurements are even with each other, otherwise you'll risk them being out of alignment when they are hung up next to each other on the walls.
Notes
You can make any design you want without a craft cutting machine!
Recommended Products
As an Amazon Associate and member of other affiliate programs, I earn from qualifying purchases.
-
 Unfinished Birch Wood Canvas Panels Kit, Falling in Art 4 Pack of 11x14'' Studio ¾'' Deep Cradle Boards for Pouring Art, Crafts, Painting and More
 -
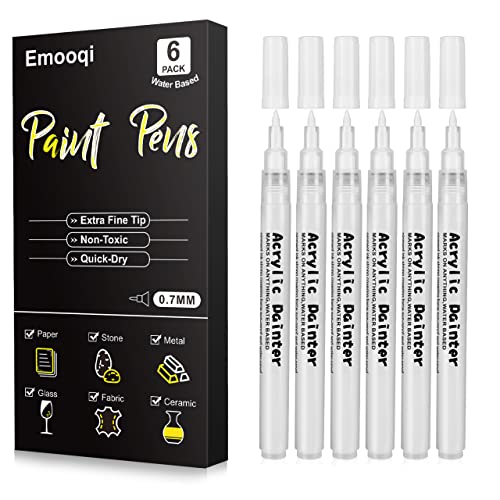 White Paint Pens, Emooqi 6 Pack 0.7mm Acrylic White Permanent Marker for Rock Painting, Wood, Ceramic, Graffiti, Metallic, Paper, Drawing, Water-based Extra Fine Point, Ideal for Artist & Students

More Wall Decor Ideas for Your Home
- Bathroom Wall Art Ideas
- Rustic Nursery Decor
- How to Hang Paper Flowers
- Paper Scroll Wall Decor
- Giant Photo Frame DIY
- How to Make a Wall Cock
- How to Decorate a Striped Wall
- Oversized Letter Board Tutorial
- DIY Trophy Display Case for Kids
- Patterned Wall with Same Color and Different Sheen
- Powder Room Wall Art
- DIY Wedding Vow Ideas
- DIY Faded Wall Art with Wedding Photo