Content may contain affiliate links. When you shop the links, we receive a small commission at no cost to you. Thanks for supporting my small business.
I’ve been at our home for four years now, and we still haven’t fully decorated or furnished the home yet! Isn’t that crazy?!
Today, I would like to announce that my daughters’ Jack-and-Jill bathroom now has a few decor pieces up! Ryan painted this room in early spring, and I have been waiting for the right pieces to decorate it with.
I really wanted to put some floating shelves on it, but I don’t think it was fitting for the girls’ bathroom. The space I wanted to decorate was the area above their toilet. That is one of the hardest areas to decorate – above the toilet!
Eventually, I landed on creating two square picture frames with a spin. My one consideration for this decor was that it had to be something that I could change out EASILY because we know what happens when little girls grow up into teenagers. The frame backing would be created out of plyboard that I could add removable wallpaper on.
After using some of our left over WallsNeedLove removable wallpaper as kitchen lining (yes, they can be used on things OTHER THAN WALLPAPER), I decided to use the Robin’s Egg Blue. I also found these unbelievably cute hearts from Michaels on clearance for two dollars!
Supplies
Square Frames (buy or DIY)
Walls Need Love Removable Wallpaper
Decor (I went to Michael’s for my hearts)
Creating the Bathroom Wall Art
1. Buy or DIY your photo frame.

We had some left over wood from a few other projects, so we created a square frame to fit the space perfectly.


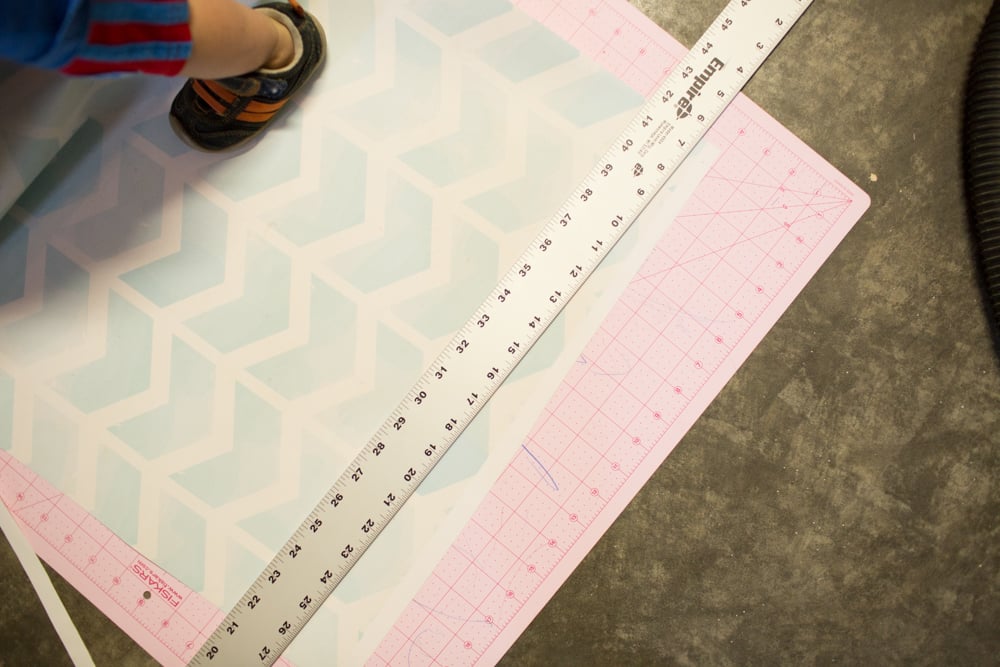
2. Next, stain or paint the frame to the color you want it. We stained it with Walnut paint. We have ruffle shower curtains made out of drop cloth (DIY to be blogged soon) for their tub, so I wanted to keep with the rustic vibe. 3. Next, we cut the WallsNeedLove removable wallpaper to size using their included razorblade. I debated on using the Blue Chevron Faded …
and the Robin’s Egg Blue …

but landed on just pairing both frames with Robin’s Egg Blue. While they were in similar color families, since the frames would be paired together, I would keep with the paired theme.
4. I stained the hearts that I purchased. I still can’t believe how cheap these were on clearance!

5. Next, I put the removable wallpaper on the plyboard following the instructions. Basically, start in one corner and smooth out the bubbles. If you mess up, the BEST thing about this wallpaper besides the design is that it is REMOVABLE. So if you mess up, just start over!

6. We put in a few nail holes to hang the hearts. Look how cute they turned out!

7. It definitely matches my girls personalities – girly like their mom, rustic like their dad.

More Wall Decor Ideas for Your Home
- Bathroom Wall Art Ideas
- Rustic Nursery Decor
- How to Hang Paper Flowers
- Paper Scroll Wall Decor
- Giant Photo Frame DIY
- How to Make a Wall Cock
- How to Decorate a Striped Wall
- Oversized Letter Board Tutorial
- DIY Trophy Display Case for Kids
- Patterned Wall with Same Color and Different Sheen
- Powder Room Wall Art
- DIY Wedding Vow Ideas
- DIY Faded Wall Art with Wedding Photo


Check out my post on custom guest bathroom hand towels for more inspiration!