Learn how to create a DIY double trash can cabinet when you can't find a standard one in stores to hide those ugly bins from sight!
I've always wanted to hide our ugly trash cans by making a double trash recycling bin with the bins attached to the cabinet doors! My biggest pet peeve about our house after we settled in was that the trash and recycle bin were always in view.
It wasn't great having the trash and recycle bins in view as the first thing you see when coming into the kitchen. In addition to that, the trash and recycle bins were up against a wall, which meant that my white walls would serve as a splash wall! Yuck!

Before Making the DIY Double Trash Can Cabinet

What I really wanted was a hidden, in-cabinet pull out trash and recycling bin. I went to look at Ikea's pull out garbage cabinet to make the project a little easier, but the bin at Ikea didn't fit our space.
We had a small space that I think was meant for cookie sheets and cutting boards that was really narrow, but a standard pre-manufactured under counter kitchen cabinets could not fit in our narrow space.
I gathered some trash bin inspiration on my Pinterest Board - House: Kitchen.
Afterwards, I convinced the husband to figure out how to customize our own sliding garbage can (which would be attached to a cabinet door).
Here are directions on how you can create your very own custom DIY pull out trash and recycle bin with tips and tricks we learned along the way!
Deciding on a Location for Your DIY Double Pull Out Garbage Can Cabinet
Planning where your sliding garbage can will go is important to the flow of how you prepare food in the kitchen! I would strongly suggest choosing a cabinet that is close to your kitchen sink or prep counter.
Pull Out Trash Can Next to the Sink
It is so convenient to pull out the slide out trash can whenever you are needing to get rid of waste quickly. Normally, this would be right next to the sink.

For us, our option was a long and narrow cabinet that could only hold cookie sheets. To turn this into a pull out trash bin and recycle bin, we went searching relentlessly for slide out trash cans that would fit that space.
Because it was way too narrow and small of a space, our efforts searching at Walmart, Home Depot, Amazon, Target, and Ikea were fruitless for how narrow our cabinetry was. That's why we ended up DIYing it.

Popular Pre-made Pull Out Trash and Recycling Options
If you are using standard cabinets sizes, I think you'll be able to find some pull out trash bins that will save you so much time. All you need to do is install it! Here are some of the more popular premade under sink trash and recycling cabinet options you can
Home Depot Slide Out Garbage Kit Options
- Double 35-Qt. Wood Top Mount Waste Container - $104
- Double 27-quart White Waste Containers - $86
- View All Home Depot Options Here
Amazon In Cabinet Trash Can Rollout Options
Ikea Recycling Bin Tray Option
- Utrusta Pull Out Waste bin - $50-ish including bins

Reasons to Not Purchase Premade Under Counter Kitchen Cabinets
The only downside for premade slide out kits is that you may have extra "wasted" space (no pun intended). My goal for this project was to ensure that we maximized our trash capacity so that we don't have to make several trips to our dumpster outside!
Frequently Asked Questions About Trash Can Mounting into Cabinet
What are other considerations for making your own double trash can hidden inside a cabinet?
The trash can should smoothly glide out of the cabinet. Find sliding tracks that are ball bearing for smooth usage.
Mounting the Slide Out Trash Can Cabinet Door Considerations
You'll need to make a decision on how your trash and recycle bin will hang off of the cabinet door for the trash bin.
- With a top mount DIY pull out trash can, you run the risk of food catching around the top "rim".
- With a bottom mount DIY pull out trash can you run the risk of food catching where the waste bin sits.
We decided to customize it to include the best of both worlds. We used some extra metal poles that we had to and created a slide out with holes to allow for any of the food that would "miss" the trash bin and allow it to go through the holes.
Update: In theory, looking back on it, this might not have been the best idea because our kids love pushing trash down and sometimes it leaks INSIDE the drawer. We ended up putting some cardboard above the poles! Watch the video for an updated version on what we did!

Attaching the Cabinet Door to DIY Pull Out Trash Can
Decide whether you want the cabinet door to slide open when you open the door.You could also have it be a two step process for throwing away the trash - first you open the door, and then slide out the bins.

For us, we kept the hardware in place for the knob so that we didn't have to do any extra work sanding and repainting the door. Typically, for a slide out waste bin, you should put it in the "middle" of the door. That's kind of the tell tale sign that the cabinet is for waste. We didn't feel like putting in wood filler and re-staining the door. Call us lazy 🙂


How to Make a DIY Double Trash Can Cabinet Under Sink
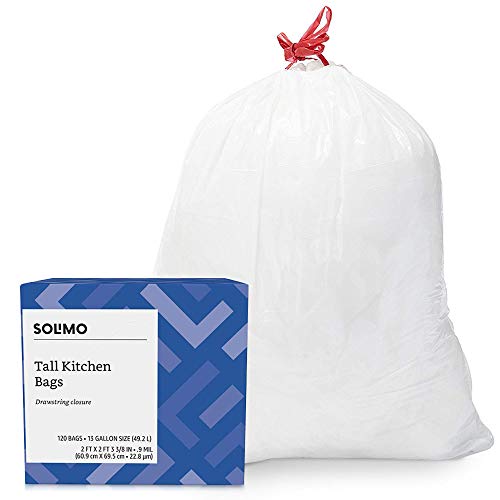
Typically, a slide out waste bin uses a plastic trash and recycle bin. One chore that I despise is having to clean gunk out of the bottom of a trash bin using a garden hose. The design of this pull out trash bin with a hollow shell (shown below) makes it incredibly easy to clean. Any trash that doesn't make it into the can either falls on the floor or onto the lid of the box, which can simply be wiped down. Emptying the cans is a piece of cake.

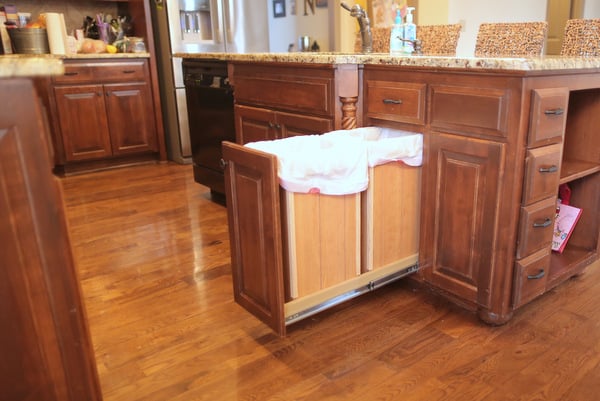
Here's what the pull out cabinet trash can slider looks like with the trash bags. It's a double trash recycling bin attached to the original wood cabinets!

Supplies and Directions for Narrow DIY Pull Out Trash Can
Supplies for DIY Pull Out Trash Can
- Drawer Slides
- Plywood
- 1" by 2" Wood
- L Trim
- Gorilla Glue
Tools Needed
- Miter Saw
- Drill
- Screwdriver
Directions for How to Make a Double Trash Hidden in Cabinet
1. Measure the length/width of your cabinetry
2. Calculate the size of what you want your cabinetry to be
3. Install the sliders on the 1" by 2" as well as the door
4. Use the plywood, L trim, and 1" by 2" to make the shell. Glue the L trim to the plywood using the Gorilla glue.
Summary of DIY Double Trash Can Under Sink
this trash can is still going strong, and we absolutely love having it next to the sink for ease of access (especially when peeling carrots or potatoes).
Do you have a DIY trash can and recycle bin or did you buy a prefabricated slide out bin? I'd love to hear how you "hide" your trash and recycle receptacles!
Other DIY Home Projects
- Oversized Letter Board for Wall
- How to Hang a Wall Picture Collage
- Easy Shiplap Fireplace
- Paint Stripes Like Professional
- DIY Cabinet Door Fronts
- Master Bedroom with French Linen Cottage Style Aesthetic
- Slide Out Spice Rack by Stove
- Kitchen Island Pendant Lighting
- Dresser Makeover: Before and After
DIY Double Trash Can Cabinet

Learn how to create a DIY pull out trash can when you can't find a standard one in stores to hide those ugly bins from sight!
Materials
- Drawer Slides
- Plywood
- 1" by 2" Wood
- L Trim
- Gorilla Glue
Tools
- Miter Saw
- Screw Driver
Instructions
- Measure the length/width of your cabinetry
- Calculate the size of what you want your cabinetry to be.
- Install the sliders on the 1" by 2" as well as the door.
- Use the plywood, L trim, and 1" by 2" to make the shell.
- Glue the L trim to the plywood using the Gorilla glue.
- Enjoy the new slideout trash waste bin!
Notes
Trash bins can be customized without buying the standard setup that you find out the big box stores. It provides you more room to fit more trash without having to empty it out so often.
Recommended Products
As an Amazon Associate and member of other affiliate programs, I earn from qualifying purchases.