• Skip to primary navigation
  • Skip to main content
  • Skip to primary sidebar
Home DIY, Design, and Organization for Families | Sengerson
  • Tour My House
  • Home DIY
  • Outdoor Living
  • Organization
  • Craft Decor
  • Gift Guides
  • Shop Home Decor
  • FREE Resource Library
  • Meet Seng
menu icon
go to homepage
search icon
Homepage link
  • Tour My House
  • Home DIY
  • Outdoor Living
  • Organization
  • Craft Decor
  • Gift Guides
  • Shop Home Decor
  • FREE Resource Library
  • Meet Seng
    • Facebook
    • Instagram
    • Pinterest
    • Twitter
    • YouTube
  • ×
    Home » Home DIY

    Craft Room Makeover Reveal - Phase 3 - Cabinet Doors

    Updated on Oct 25, 2025 by Seng. This post may contain affiliate links, please see our policy for details.

    I'm so excited to share with you my final reveal of our craft room that showcases the final phase of the craft room cabinets. It was four weeks in the making, but we finally got here.

    I'm sure you have seen the previous post on our progress with one of our favorite grey paints and our new hypoallergenic flooring we added to the room so far.

    I am so in love with all my cabinet storage that I now have. I am so glad I got rid of the dark built-ins. While they matched our cabinetry downstairs in the kitchen, the height and the placement of the desk and electrical outlets just didn't flow. I have a sewing machine, Silhouette, laptops, monitors - it got kind of crazy with all the extension cords I had.

    Here are a few of the before pictures:

    craft room cabinets before
    craft room cabinets

    While it was functional, I just felt cramped in there.

    Initially, I decided that maybe I wanted to reface the cabinets with white paint. Having used my own homemade version of chalk paint on my dresser and nightstand, I figured it would be pretty easy with these cabinets.

    craft room cabinets

    Let me tell you, this was a terrible idea. There was way too much surface area and I was not happy with the results from just priming!

    ikea kitchen cabinets craft room

    I went so far as to bring the drawers downstairs in the basement. It was taking way too long and I had no patience for it.

    ikea kitchen cabinets craft room

    So we decided to get Ikea kitchen cabinets (SEKTION line) for the space. I wanted overhead built-ins. When I priced it online, it was going to be a pretty penny. My tip: Go in-store and find an employee who has the numbers for each of the pieces memorized! I found a gal in the kitchen department who said I could just buy the frame for now pretty inexpensively to store all my things and come back and get the doors later. The 15" by 30" frames for the cabinet's were under $50 a pop! The doors were on average $75 a DOOR and you needed two doors.

    ikea kitchen cabinets craft room

    My handy husband decided that he could make the doors inexpensively using trim wood and wainscoting/beadboard. And he did! It ended up costing about $8 a door. He ended up making about $15 doors.

    Here are a few images just so you have an idea how we put it together. 

    ikea kitchen cabinets craft room
    ikea kitchen cabinets craft room

    See that beadboard? It's awesome because it provides those rustic lines I love that are similar to shiplap.

    ikea sektion cabinets for craft room
    ikea sektion cabinets for craft room
    ikea sektion cabinets for craft room
    ikea sektion cabinets for craft room

    And then he painted it with a high volume, low pressure paint gun (that attaches to his air compressor) that he purchased at Harbor Freight for under $10. 

    save money with ikea sektion cabinets

    We painted it with our tried and true Benjamin Moore White Dove in semi-gloss.

    Here's the final product using the hinges from Ikea Sektion line:

    save money with sektion kitchen cabinets

    So much storage!!! I love it so much!

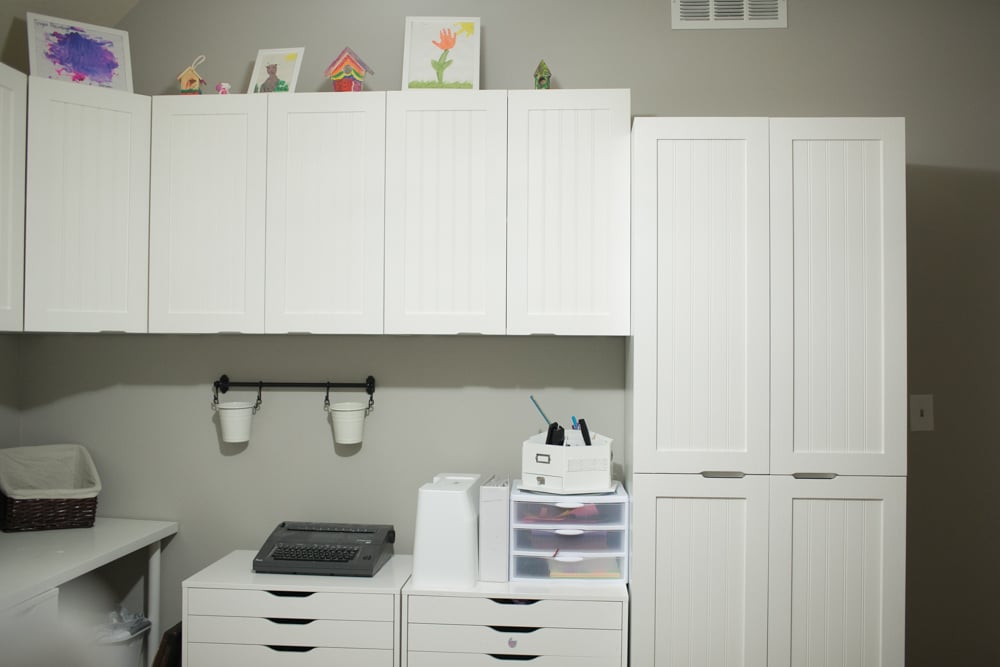
    To get an idea of what I store and how I store, here's an image of what I place in each cabinet:

    Check out my post on how I cut a hole in my Ikea linnmon table.

    More Home DIY Inspiration

    • IKEA Craftroom Makeover Roundup Ideas
    • Painted Basement Ceiling Ideas
    • DIY Cabinet Door Fronts

    More Home DIY

    • DIY Tree Ring Makeover: How We Transformed Our Front Yard for Under $100
    • dresser before and after makeover
      Stunning Dresser Before & After Makeover (DIY Chalk Paint)
    • DIY Hack to Make IKEA Alex Desk Taller (Raise the Height)
    • DIY Reupholster Wingback Chair: Before and After

    Subscribe for Access to Resource Library

    Get access to the FREE resource library with affordable home decor, printables, and family vacation hacks! You'll also receive my monthly newsletter with exclusive tips and tricks.

    Disclosure

    Many of the links on this blog are affiliate links. Sengerson.com receives a small comission when certain items are purchased, but the price is the same for you. Sengerson.com is a participant in the Amazon LLC Associates Program, an affiliate advertising program designed to provide a means for sites to earn advertising fees by advertising and linking to Amazon.com.

    Primary Sidebar

    Nice to meet you!

    Seng is a life and style blogger for the modern mom. She is a mom of four that works outside of the home balancing the delicate balance of her career and being present for her family.
    Hi I'm Seng - a working mom, loving wife, lifestyle blogger, family photographer, and the ultimate purveyor of the "honey do list". More »

    Looking for Something

    Footer

    ↑ Back To Top


    Meet Seng

    • About
    • Shop
    • DIY Web Stories
    • Home Tour
    • Privacy Policy
    • Contact

    Ideas by Room

    • Bathroom
    • Bedroom
    • Living Room
    • Dining & Kitchen
    • Outdoor Living
    • Paint Colors
    • Organization
    • Shopping Guide

    Motherhood

    • Parenting
    • Baby Registry
    • Productivity Tips
    • Easy & Fast Recipes
    • Mom Fashion
    • Kids Fashion
    • Gift Guides

    ©2025 Sengerson, LLC. All rights reserved.

    • Facebook
    • X
    • Pinterest
    • Email
    • Print
    • Save