If you have ever wanted to revive an old wingback chair, I'm sharing with you my favorite tips and tricks reupholstering an old chair or one you've picked up off of a second hand marketplace.
Wingback chairs are considered a classic piece of furniture as they have been around since the 17th century, but they have become popular recently as beautiful accent chairs that can certainly make the space. They can look elegant depending on the fabric that is used. With their wings, they become cozy in fall and winter. Most of all, they are highly comfortable to sit in. Wingback chairs can also provide privacy in open spaces and are perfect for quiet conversations because of their high backs and enveloping curves.

If you are thinking about buying a new one, they can be pretty expensive. Buying a new one can be a big decision. But if you ever have one or found one from a thrift store but think that it is old, a bit damaged, or the color does not match in your home interior anymore, you may consider having it reupholstered.

Re-upholstering can also be quite expensive; however, doing so is environmentally friendly as you do not need to throw away your old furniture. With re-upholstering, there are a multitude of options as you can choose what color or fabric you want to have for your piece. But if it's still out of the budget, DIY is almost always a great solution.
Reupholstering a Wingback Chair Benefits and Upsides
There are so many benefits of finding and refurbishing an old wingback chair. Here's a list of some of the benefits of making over a wingback chair.
Cheaper than buying a new one
It is a fact that wingback chairs are expensive. So if you have an old one, it is ideal for restoring it by having it reupholstered as you only need to buy the materials you need for the makeover, such as fabric. You can even reuse other extra textiles that you have at home, such as old curtains.
Get the style you want
One good thing about doing the makeover by yourself has your items customized the way you want them to be. Unlike buying a piece of new furniture where styles are limited, a wingback chair makeover will let you enjoy choosing the fabric and design you want.
Personalization and uniqueness
If you do not want to have the same style or wingback chair piece as the others, doing the makeover yourself will satisfy you that only you have that kind of furniture in the world.
Cost for Reupholstering a Chair
If you are new to reupholstering and only need to reupholster one chair, it is ideal to seek professional help to upholster your wing chair. This may costs you $600 to $1500. We have actually had one reupholstered for around $650 total, and that was without the cost of the fabric.
If you love the thought of DIY-ing and saving money, the cost of reupholstering a chair will be cheaper than hiring a professional to upholster as you already have your tools. Buying the materials such as fabric, batting, cording, and other necessary supplies from a fabric store would likely cost you $300 to $450.
It will also help lessen the cost if you learn to reuse some of the things you may have at home, such as an old fabric or an old curtain.
Using Old Drapes and Curtains to Save Money
Do you have an old curtain that you like and have not used for years? If so, you can reuse it as your fabric source to save costs in reupholstering a chair. This is exactly what we did.
I decided to use old two story curtains that I had made over to reupholster these two wingback chairs that we found. The curtains were custom made, but were too dark for our space. They were pretty expensive. So I decided to reuse them for my wingback chairs, and so glad that I was able to!
Generally, you'll want to have reupholstery fabric for your chairs to account for wear and tear. So far, three years later, these linen fabrics have done great!
Finding Old Wingback Chairs
I found my wingback chairs through Craigslist, Facebook Marketplace, and Habitat for Humanity Restore Shops. I generally find these chairs anywhere between $15 to $30 per chair as a great deal. Many have amazing bones while others may need some tender love and care with a need to add more fill or batting. Here's a chair I found at Habitat for Humanity Restore Store:

Here's the ad that I saw, which had the wingback chairs hidden in an antique store:

Here's what they look like next to a car so you can see how big they are. I saved so much money buying these chairs that have good bones.

Overall, wingback chairs can be easy to find. The best way I know to look for chairs the quality of the chair is to go look in person and actually sit on the chair to see if it's comfortable.
Neutral Fabrics for Wingback Chairs
We've found a lot of fabrics online via Amazon that are perfect if you are looking to reupholster your chairs. I personally stay away from bold prints and generally allow my fabric to be the canvas for my decorating, while using more inexpensive accessory pieces like throw pillows and throws that will allow me to pull the design together.

I placed the chairs in the space for about two weeks to get an idea of the space. I then took the sample fabric and placed it on the chair for a few days so I could see the color in the light.

Here are some of my tried and true fabrics that I absolutely love for accent chairs, slipcovers, and sofa makeovers. I feel as though Amazon has an amazing selection of fabric, which I would have never thought of buying.
Measuring for Material for Reupholstering a Wingback Chair
It is essential to know if you have enough fabric to cover your wingback chair, as knowing how to measure the material you need can help you get the right amount of fabric for your job. Here are some tips on how you can get accurate measurements of your wingback chair:
- The chair's back length should be measured from the bottom of the chair leg to the highest point on the chair's back.
- Starting from the outside of one side of the cushion to the other, measure the cushion's length.
How to Reupholster Wingback Chair
How to Reupholster Wingback Chair (Easy)

Learn how to reupholster a wingback chair with a skirt and save hundreds of dollars.
Materials
- Approximately 9-10 yards of fabric
- Upholstery staple gun
- Quiet air compressor for a staple gun
- Air compressor hose
- ¼″ air compressor connectors
- Pliers
- Staple remover
- Sewing machine
Tools
- Jute webbing
- Webbing Stretcher
- Regulator
- Cotton piping
- Dacron polyester batting
- Cotton batting (by the roll)
- Coir coconut fiber stuffing
- Burlap
- Spring twine
- Tufting twine
- Dust cover
- ⅜ staples
- Cardboard tack strip
- Flex-Grip (also called Curve Ease)
Instructions
- Dismantle the chair. Start by locating and removing the dust cover of your wingback chair. To remove the dust cover, you need to peel away the bottom cording and then remove the back piece part of the chair. After that, you can start eliminating other parts of the fabric of your wingback chairs, such as the side and upper parts. Once you remove your fabrics, it’s time to remove the other parts, such as the webbing, springs, burlap, and the rest of the chair cutting. You can use a pair of pliers, scissors, and a staple remover to break down the parts of your wingback chair.
- Measure and Install a new webbing. Measure how many webbings and the sizes you need for your wingback chair. Start installing your webbing at the front using a webbing stretcher and a stapler. After installing the first piece, the next part will be close together towards the back.
- Install the springs on the seat. Get the old springs you have on your wingback chair. Using a pencil, mark them on your webbing, sew, staple and tie the springs altogether.
- Cover the Springs. Use coconut fiber to fill all the valleys around the spring. Get your burlap, nail it in the frame and sew it again to secure the burlap to your springs.
- Measure the chair to create the pattern. All of the burlap pieces should be on the chair by now. Get a measuring tape to measure all the areas you need to cover with the fabric. Prepare your fabric to be cut and placed in your wingback chair.
- Sew the fabric into your chair. Once you measure and cut your fabric, it is time to sew them in your chair. Prepare and cut your cotton batting and place them in the seat, sides, wings, and other areas of your chair. Cover and sew them with fabric – remember to pull tight and then staple.
- Remove unnecessary fabric, staples, and stitches. Inaccurate measurements cuts are common, so you may probably have excess fabric covering your wingback chair. Cut them and look for any staples or stitches that do not look right. You can remove and cut them.
Recommended Products
As an Amazon Associate and member of other affiliate programs, I earn from qualifying purchases.


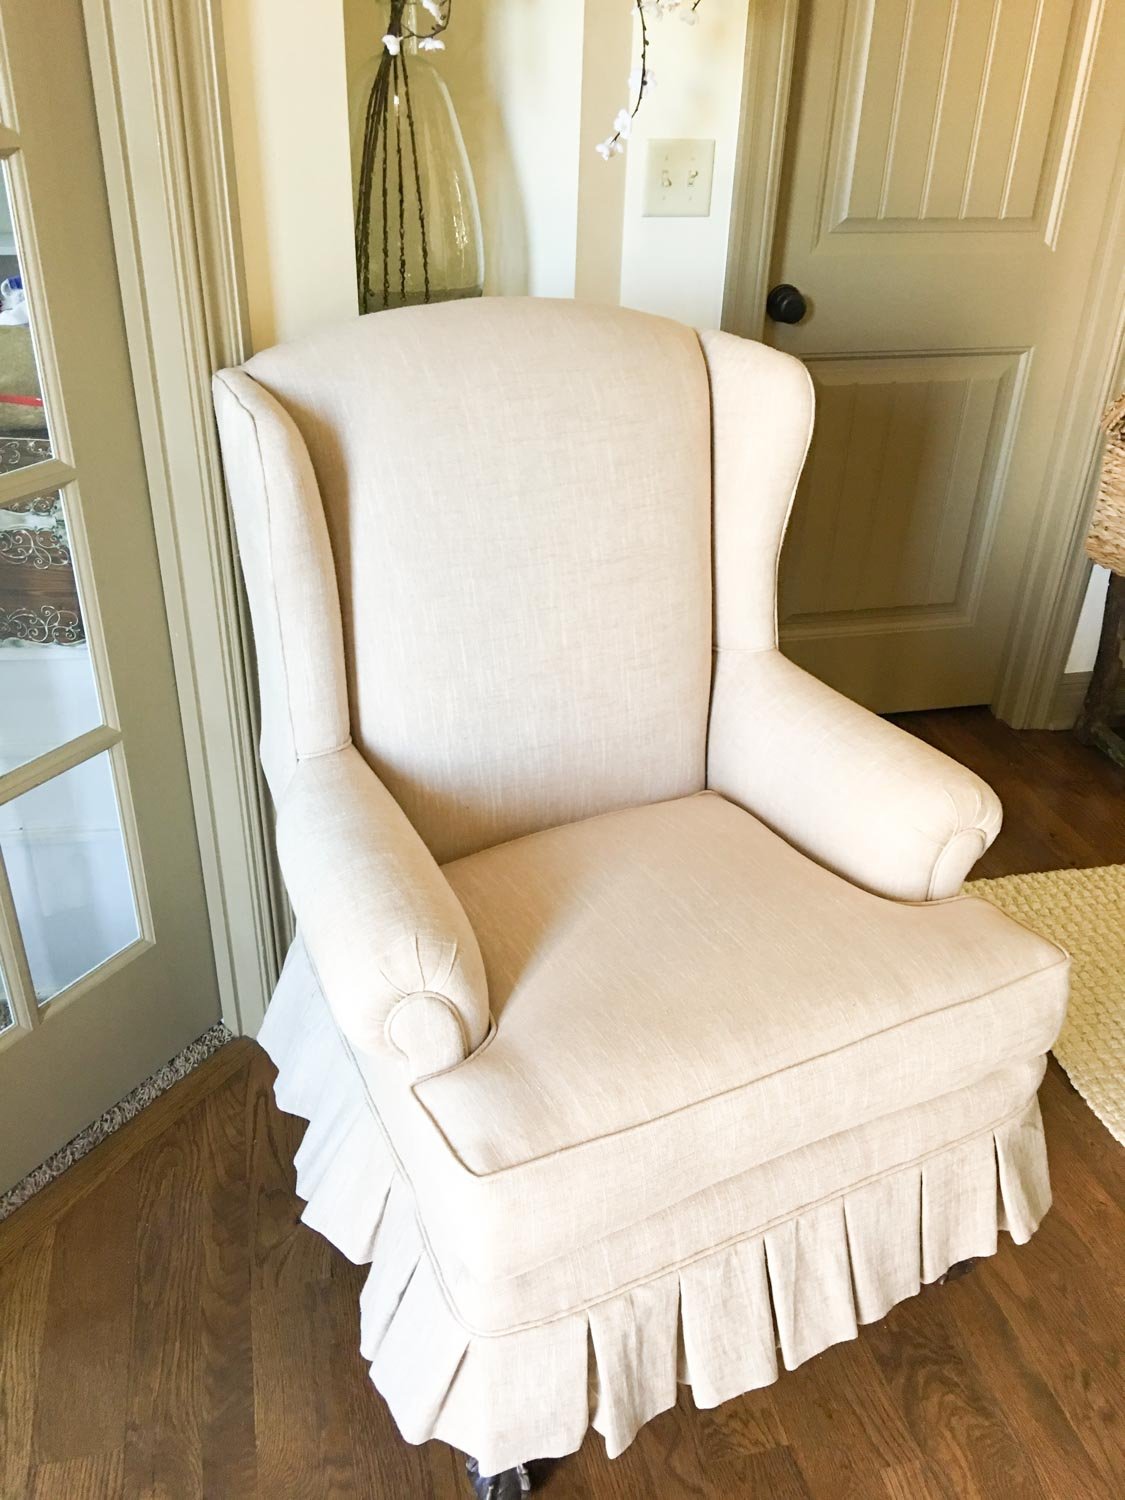
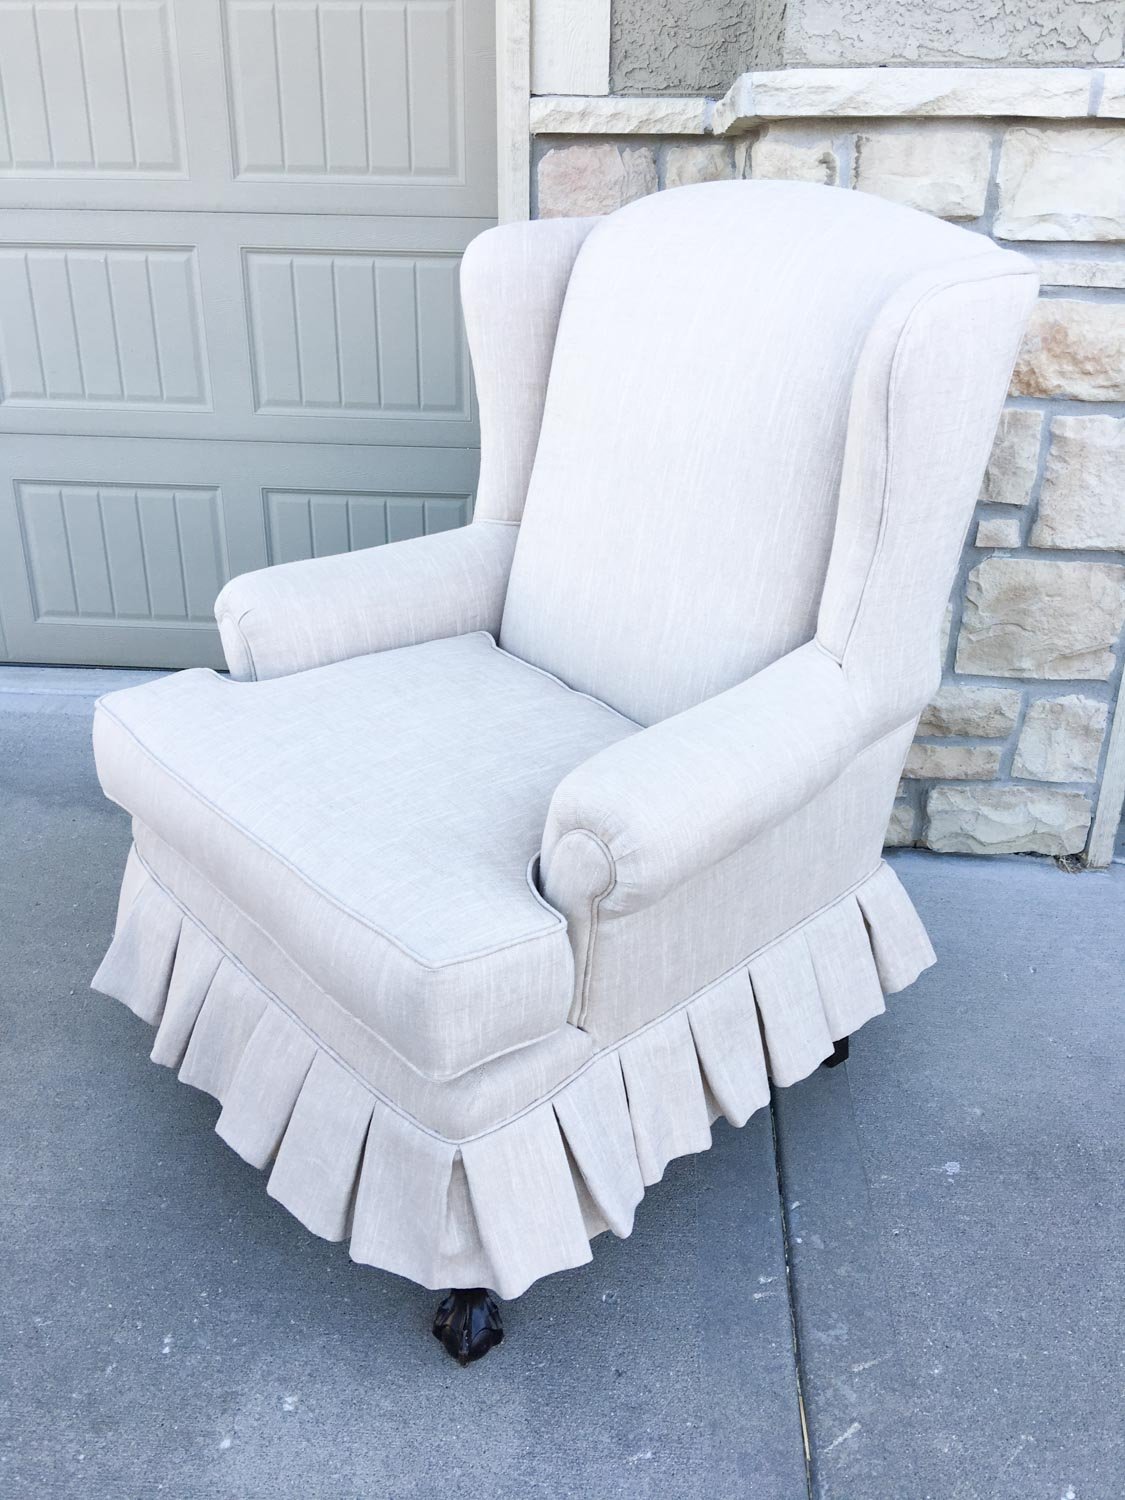
Other Views of Our Wingback Chair
For inspiration, here are some views of our wingback chair with a skirt that you might love!


Frequently Asked Questions
If you are new to reupholstering or doing things DIY, this project may be challenging for you as it requires many tools. However, reading blogs (like mine) or watching videos on how to reupholster your chair will be a great help to start and make things easier. You can also sign up for a local upholstery class to learn better.
Upholstering a chair requires a high degree of attention to detail, and if you have never upholstered a chair, it is a challenging DIY project. It is already easy to get things a little out of whack on the fabric itself. Apart from that, there is a potential you will unintentionally pull the fabric taut in specific locations, resulting in an unattractive look.
Take your time and investigate each area entirely if you want your wingback chair project to succeed and have the most excellent results. After all, this DIY upholstery project will also take some time to complete.
Changing out the legs on a chair is simple because most of them are already attached Changing out the legs on a chair is simple because most of them are already attached and predrilled for the screws. But for those that are not, you may need to make some adjustments.
Summary for Reupholstering a Wingback Chair
Wingback chairs have been present since the 17th century and are regarded as classic pieces of furniture. They are both stylish and cozy in the fall and winter and are incredibly comfortable to sit on. In addition, having them reupholstered or given a complete makeover has several advantages.
It is satisfying to know that you are the only one in the world with a specific wingback chair type or item and that no one else has it, and if you want that to happen, reupholstering your wingback chair will be ideal for you. However, doing so is never easy, especially if you are new to DIY or reupholstering. You will need a lot of tools to start your project.
Upholstering a chair is a challenging DIY project that needs close attention to the smallest of details. Completing this do-it-yourself upholstery project will take some time as well. But I hope that this blog helps and gets your interest in reupholstering your wingback chair.

Furniture Seating Inspiration
- Buffalo Check Accent Chairs
- Pottery Barn Sofa Slipcover Knockoff Dupe
- Wingback Chair Reupholstery Cost and Makeover Tutorial
- How to Choose a Slipcover Sofa
- White Slipcovered Sofa with Kids
- Sofa Ideas for Small Family Room
- IKEA Ektorp Sofa Slipcover on Pottery Barn Sofa
- Best Sources for Sofa Slipcovers
- Custom Pottery Barn Slipcover Makeover
- Slipcovers for Every Type of Sofa and Couch
- Adirondack Chairs (American Made)
- Reupholstered Wingback Chairs: Before and After
- IKEA Finnala Honest Review