Content may contain affiliate links. When you shop the links, we receive a small commission at no cost to you. Thanks for supporting my small business.
I’m going to show you an easy tutorial on how you can create a sliding closet barn door that you can make in one weekend! If you’ve been obsessing over that farmhouse or cottage style design, this is a great project that would look beautiful in your home!
I had a closet that I wanted to have double hung sliding barn doors that I could easily shut and close. I know it sounds like a ridiculous request, but I was creating an office in our basement.
The closet area in this space would be used to store a lot of my photography equipment as well as my blog equipment. In addition, I recorded video in our basement, so it was important to me to be able to stash everything, but also have everything streamlined so I could clean up really easily.

Building a Barn Door on a Budget
The basement renovation was taking a hit on our home management budget. So, I had to forgo actually purchasing nice doors and be able to design a door that would meet our needs and our budget.
Creating a custom barn door would have been upwards of $2,000 for this space. Because it was a custom opening, the cost was more expensive than a standard door (which came in at $1,500). That’s pretty steep considering that it’s just a freaking door.
There are definitely a lot of various styles for barn doors, but I loved the British Brace barn door look. The lines were clean and it was a less difficult design to build from scratch.
So when it was said and done, the cost for our own custom door was $100 and four hours of work! Not bad!
Here’s a before photo of our basement before it was even finished!

Sliding Barn Door versus Pocket Door
At one point, I had considered doing a pocket door. A pocket door is when the doors actually go INTO the wall (like between the frame).
I LOVED the look of the pocket door, but as you know, for every project there is time, scope and cost to consider. I am more of a “get it done fast so we can move on with our life”, so I obviously chose the easier path because it would be done faster.
Before you truly make a decision on having a barn door, here are some considerations you might think about.
Closet Barn Door Considerations
Pros:
- Takes up little space
- Easy to install and maintain
- Less likely than pocket doors to develop issues
Con:
- Heavy
- Blocks the wall behind it when open
- Has potential to come off the track
- No resale value potential
Closet Pocket Door Considerations
Pros:
- Takes up little to no space
- Does not block wall when open
- Potential to increase resale value
Con:
- Difficult to install
- Maintenance is high
- May come off track and harder to fix
The other thing I will say is that I wanted a light socket behind one of the doors. While it is dumb to have one right behind a door, if you really need it, with a barn door you could have it there. With a pocket door, you can’t really wire in electricity into the frame.
The reason why I needed it there was because I needed a place for my desk area. The closet door would hardly be open when I was using the office, so I was okay with it!
Before You Purchase Tools and Supplies for Your DIY Sliding Barn Doors
It is super important for you to measure the entire opening of your closet space. You’ll want to add an inch to your door to cover the opening.
Now, it’s time for me to reveal how you can accomplish a beautiful, interior sliding barn door at the fraction of the cost of buying one custom made! I’m going to outline the high level points, but you’ll definitely want to make sure you get the exact measurements for your space.
Tools Required for Creating a Barn Door
- miter saw
- screw driver
- square
- pneumatic nailer
- pneumatic sprayer
Materials Needed for DIY Sliding Barn Door
- 3/4″ plywood (which is used for the back of the doors)
- 1″x4″ boards for trim
- caulk
- wood filler
- primer (this is the best one)
- paint
- 6ft barn door track kit or 8ft barn door track kit (amazing prices, seriously!)
- black steel door handles (see note below)
How to Make Double Sliding Barn Doors for Closet
Step 1 | Determine Your Space
Before you start measuring anything, you’ll want to review the space where you want to install this sliding barn door. Make sure there aren’t things that will be hidden if you install the barn door (like light switches, outlets or even wall lights).
Determine also whether you want to have one big door that slides or two doors that separate like french doors.
Step 2 | Measure the Width of the Opening
You’ll want to make sure that before you build your barn doors that you have your exact measurements for your opening. Sliding barn doors should have at minimum an inch more than the sides of the opening of the closet, you can also add a little more overlap so there’s more privacy (especially if it’s a bathroom space).
To determine the width of the opening of your space, you’ll want to make sure you add a minimum of 2 inches to the width.
For us, we chose to give 2 inches on each side to at least cover the door entry.
If you decide that you want to increase the overlap, make sure that the wall that it will be sliding open in front of does not have a electric socket in front of it!
Here are my general recommendations:
- For door openings with casing/molding: Measure from outside to outside of casing/molding across for the width and from the top of the casing/molding to the floor for height. Add 1″ to 2″ per door for overlap depending on privacy needs.
- For door openings without casing/molding: Measure the inside of the opening across for width and from the top of the opening to the floor for height. Add 2″ to 4″ per door for overlap depending on privacy needs.
Step 3 | Buy Your Hangers and Rails to Determine Height
In most cases, you typically buy your hardware after finishing the renovation. However, for sliding barn doors, it is really important for you to buy your door hardware before you start your project!
Make sure you follow the manufacturer’s instructions before hanging. Typically, you’ll measure the top of the opening with no trim and subtract 1/2 inch from the measurement so that you have the minimum height for the door.
You’ll also want to make sure you have enough clearance above the opening so you can lift the barn door into the track.
Buying them early will allow you to know what your drop is for the doors! This is important before actually buying wood!
As we started researching and hunting around for the best affordable barn door hardware, we realized that there were so many different options and also varying looks that we could choose from. It was important for us to actually MEASURE the space before we even began pricing out the hardware. Here’s the hardware we got.
Step 4 | Install the Support for the Tracks
The track will need to be firmly and securely fastened to the wall framing. There are various ways that you can go about this, but we decided to mount a header board to the wall surface, paint it the color of the wall, and then mount the door to it!
Here, we installed the header, you can see how far out it goes.

Here’s a closer view of that space:

This is a side view of the entry into the basement.
Mark the hanger for holes!

At this point, the entire room was painted and we finally added the rail.

Grab your measurements for the height, and leave 1/2 to 1/8 of an inch for the ability to slide (or follow manufacturer’s instructions.
Step 5 | Install Spacers and Floor Guide
As part of the track kit, you’ll get a bunch of spacers that will separate the track from the wall so that the door can slide open and close.
There is also a guide that needs to be included at the bottom. It typically is an L-shpaed guide that helps guide the door back and forth.
As an alternative, you can buy a piece of cold rolled steel from the local steel mill – it was $70 because they only sell it in 20 ft sticks, but they’ll cut it down for you.
Step 6 | Buy Door Material
Next, now that you know the measurements of the door, you can choose between pine, poplar (best option) or rustic old wood to make your door. We used inexpensive pine to make our door. We used plywood for the back of the doors and placed the pine diagonal piece below it.
Step 7 | Assemble the Boards
We used a pretty popular design style that was also modern called British Brace barn. For our design, we used the same size pine all the way around.
We used a miter saw to cut the pieces and used a combination of wood glue and screwing in pocket holes.
We chose the shaker style, we built it and use a router and a slitting bit to make the groof for the shaker panel to slide in.

We also decided to cut the extra plywood and make the braces inside the barn door instead of using the pine wood so that it would sit flush inside.
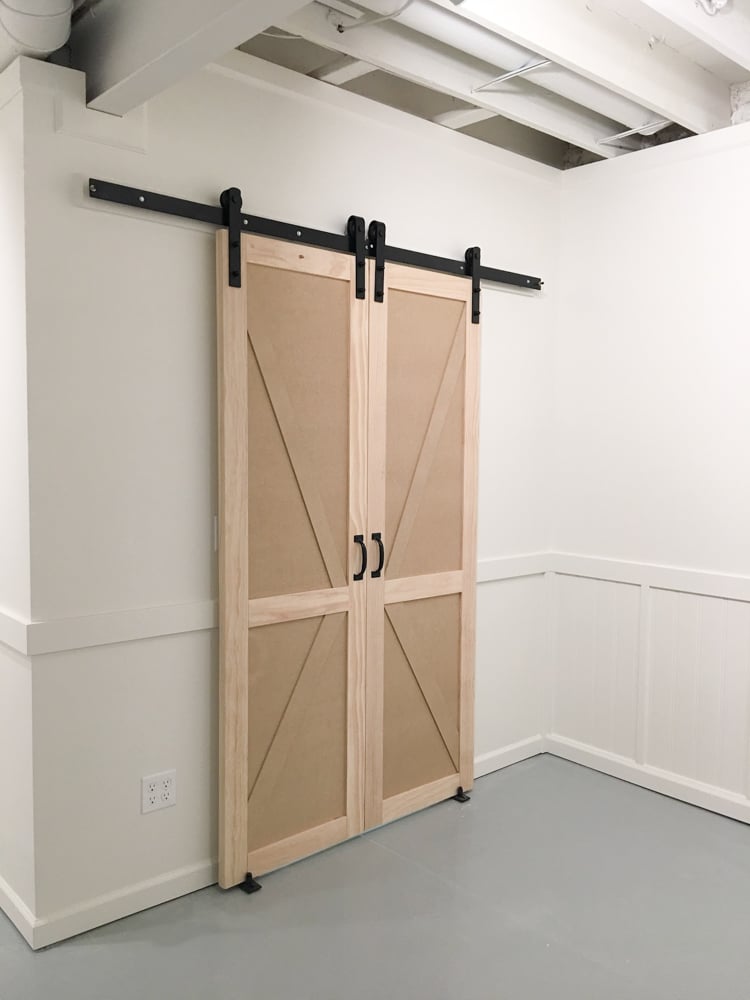
Step 8 | Prime and Paint the Door
Now that it was hung up, we primed and painted the door! We have khaki colored doors in the entirety of our house, so I decided to have him paint it the same as the other colors of the doors in our house. Here’s an example of one of the doors in our home!

Step 9 | Paint, Hang and Level the Rail
With the track mounted, put the door on the track and roll it into each end!
Mount the end stops and you should be good to go!

Step 10 | Mount, Hang the Track and Enjoy
Here’s a photo of my basement office, it is super messy right now!

The doors turned out so well that one of our good friends asked us to commission one for them!
Frequently Asked Questions About Sliding Barn Doors
Here are some frequently asked questions I get about our barn doors that I wanted to make sure you think about!
How to build a barn door frame palettes?
I would recommend using pine or poplar board instead. You’ll need to do a lot of sanding and prep work for getting palettes good enough to paint!
Are barn doors practical for bedroom closets?
Yes, barn doors are practical if you have the space for them to slide. I would love to do this for our space, but we have a perpendicular wall that juts out!
Can I hang barn doors with closets?
Of course! We did it above and we love how it turned out.
How thick should barn doors be for linen closet?
If you are wanting to install a barn door in a linen closet, it should be the same as the current closet, which is 1 3/4″ in thickness.
How do I measure for a barn door closet?
You have to make sure you add an overlap in your measurement of the opening for the width, that’s key! For the height, you MUST GET the hardware before you get the height for the barn door.
Will a closet sliding track hold a barn door?
I would highly recommend against this! A barn door’s appeal is because of the outer track!
How do I convert a current closet door into a barn door?
I wouldn’t necessarily convert a builder closet door into a barn door. I would recommend following the steps above and building it custom yourself with your favorite design!
What do you think? Do you like the look of sliding barn doors? I love this as a great space saving option! It might be a trend, but it is a time saving one that I absolutely love!
This door is one of my favorite aspects of this space! I love not having a swinging door that goes in and out, which saves me a lot of room!

If you love this sliding barn door post, I think you may also like our project on creating a double pull out garbage can. It’s been an amazing way to take a space that is hardly used and being able to hide trash from plain view.
Other Basement Posts You Might Love
If you loved this post on open sliding barn doors, check out these other posts:
- Open Ceiling Basement
- DIY Sofa Table Easy and Fast
- Velvet Hangers for More Space
- Water Leak Detector for Basement
- Cable Organization Tips and Tools
- IKEA Desk and Cable Management Tips